Drawing Lambdas

The other night I was watching a video on the lambda operator in Ruby 1.9.1, which can be spelled out or represented as ‘->’.  Coming from a C++ background and having dabbled in Scheme and Haskell ‘\’, I felt a little uncomfortable with this syntax.  So my first thought was that it’d be nice if you could knock off all of this ASCII tomfoolery and just use Unicode lambdas in code.  This leads to two problems though:

  • Unicode friendly keyboards don’t really exist
  • Source code tends to be strictly in ASCII

Typing Unicode

Let’s deal with the Unicode keyboard problem first…

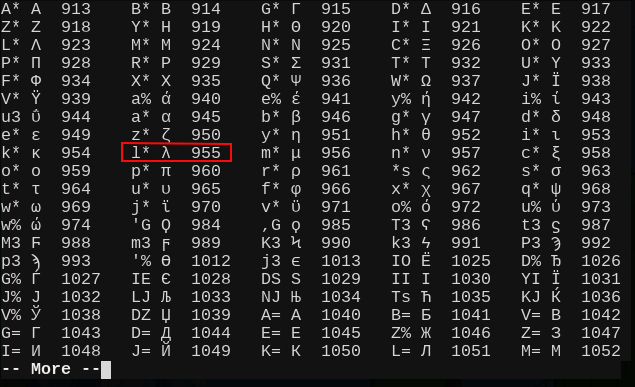
One method to get lambdas into your code is to use digraphs in Vim.  To get a full list in the editor use the command ‘:digraph’, this will draw a matrix of every combination available.  As depicted in the screenshot below (scrolled down to Greek symbols) each column has the two-key combination, the symbol, and the Unicode decimal representation.  To insert a symbol use Ctrl-k and the two-key combination.  For example,  lambda is Ctrl-k l*.

What’s really nice about the digraphs table is that many combinations are easy to figure out.  For example, all Geek symbols are the Ctrl-k prefix and the letter followed by an asterisk.

Some are even obvious:

Diacritic Example Digraph
macron ē (letter + minus)
trema/umlaut ü (letter + colon)
cédille ç (letter + comma)
circumflex û (letter + caret)

Unicode in Action

Now all this is fun to play with a bit, but your compiler/interpreter will likely be upset with your latest additions. The few exceptions will be languages that are very friendly to Unicode strings like Go and Python.

hello_world_gr.go

package main

import fmt "fmt"

func main() {
    fmt.Printf("Γεια σας κόσμο!\n")
}

hello_world_gr.py

#!/usr/bin/env python

def main():
    print("Γεια σας κόσμο!\n")

if __name__ == '__main__':
    main()

However, when I said I wanted to see lambdas in my code I didn’t mean inside of string literals, I meant actual lambdas as keywords.  If I try to put a lambda symbol in place of the keyword ‘lambda’:

#!/usr/bin/env python

def main():
    # λ == lambda
    square = λ x : x * x
    nine = square(3)
    print(nine)

if __name__ == '__main__':
    main()

I will get the following error:

File "hello.py", line 5
square = λ x : x * x
^
SyntaxError: invalid syntax

Faking It

This leads me to my second point; you don’t really want lambdas (or any non-ASCII) in your code, but you may want to see lambdas in your editor.  In Vim, you could apply the conceal patch, which is standard in recent versions of Vim 7.3.  Conceal allows you to create syntax rules for drawing specific keywords and string matches as any symbol you like.

For instance, the Vim command:

:syn keyword Operator lambda conceal cchar=λ

will swap out the keyword lambda with the symbol λ, but not modify the text.  Moving the cursor over the lambda symbol will reveal the letters for editing.  Your compiler never has to know you were experimenting with Unicode.

.vimrc rules

There  are already many script implementations that do this kind of thing, but I  really like this solution for it’s ease of implementation.  I’ve got the following rules in my .vimrc, that I’m sure to tweak until I’m satisfied.

if has('conceal')
    if has('autocmd')
        autocmd Syntax * syn keyword Operator not conceal cchar=¬
        autocmd Syntax * syn keyword Operator lambda conceal cchar=λ
        autocmd Syntax ruby syn match rubyKeyword "->" conceal cchar=λ
        autocmd Syntax haskell syn match hsKeyword "\\" conceal cchar=λ
    endif
    hi! link Conceal Operator
    set conceallevel=2
endif

Essentially, there are four Vim syntax rules that don’t live in individual syntax files:

  • Draw not as ¬ for every file type.
  • Draw lambda as λ for every file type.
  • Draw -> as λ for all Ruby files.
  • Draw \ as λ for all Haskell files.

These rules are typically placed in syntax files, but I’m still test driving them and I don’t want to repeat the first two rules for every syntax file.  For the time being they can stay in my .vimrc where I can keep an eye on them.

Now Stretch

The whole point of going through these steps is attaining more flexibility.  Hopefully now you feel less restricted by your keyboard and your languages’ syntax.

If you feel Pascal’s not equal, <>, makes your skin crawl, you can change it with:

:syn match pascalSymbolOperator '<>' conceal cchar=≠

or to add to your .vimrc

autocmd Syntax pascal syn match pascalSymbolOperator '<>' conceal cchar=≠

For example:

while (a <> b) do WriteLn('Waiting');

is shown as

while (a ≠ b) do WriteLn('Waiting');

Everyone has completely different preferences; so if you don’t like something, change it.
The Wonderful World of tmux

tmux in my opinion is the best tool for interacting with the shell.  Having been a daily user of tmux for the last 2 years, I’ve put a lot of thought into customizing it to suit my needs.  As an ArchLinux user I found the tmux ArchWiki to be an excellent resource for picking up tips on using and customizing tmux.   My own .tmux.conf is available on github and for the remainder of this post I will be breaking my configuration down.

Preliminary (ditch ‘Caps Lock’)

This step isn’t necessary, but considering I use the Control key almost as often as the spacebar, I find it cuts down of the hand contorsion.  I learned from using Emacs that if I’m going to tap the Control key all day long it needs to be on the home row.  There’s usually an option in the keyboard settings for your desktop environment to change the behavior of Caps Lock to be another Control key.  I have the following in my .Xmodmap file which loads when X Windows starts:

remove Lock = Caps_Lock
keycode 0x42 = Control_L
add Control = Control_L

Prefix

The first thing that had to go was using Ctrl-b as the command key, the key combo that preceeds every tmux command.  Even with the Control key on the home row, I find my hand a bit stretched for a gesture I will have to make everytime I invoke tmux.  I suppose Ctrl-a and Ctrl-x were avoided because of GNU Screen and Emacs respectively, but I chose Ctrl-f since my left hand on the keyboard can make that combo nicely from a resting position.

# Change prefix key to Ctrl-f
unbind C-b
set -g prefix C-f

Next, prefix-d detaches the session by default. Considering my previous change I accidentally hit this combo too often, so I unbind(ed) it and type out the ‘detach’ command when I want to detach a session (which isn’t often).

# Remove shortcut for detach session
unbind d

Navigation

As you may know one of the features of tmux is to create numbered windows with prefix-c, which can be navigated forward and backward with prefix-n and prefix-p respectively.  By default tmux starts numbering windows at zero, which is inconvenient because zero and one are far away from one another on the keyboard.  So cycling between the between windows 0,1,2, and 3 feels unnatural.  I resolve this by setting the base index to one instead of zero.

# Start numbering at 1 intead of 0
set -g base-index 1

I also find myself switching back and forth between two windows frequently, which prefix-l can do nicely.  However, using another key seems unncessary when I can get the same effect by double-tapping the prefix command (for me Ctrl-f).

# Last active window
unbind l
bind C-f last-window

Likewise, prefix-& [Ctrl-f Shift-7] to kill a window seems very uncomfortable, which may be the idea to prevent accidentally closing windows.   Instead, I decided to use prefix-k for ergonomics.

# Kill window
bind C-k kill-window

Pane Management

To me the panes in the tmux are the most fun to work with, especially because they don’t require finicking with the mouse to line up code in windowed terminals.  Although the default mappings could have been much simpler.  My thinking is that a vertical bar means split vertically, and a horizontal bar means split horizontally.  So I cheat a little by using the ‘-‘ and ‘\’ keys to represent ‘_’ and ‘|’, which become my new horizontal/vertical split commands.

# More straight forward key bindings for splitting panes
unbind %
bind \ split-window -h
unbind '"'
bind - split-window -v

To move around in tmux you can use:

  • prefix-o, to cycle through panes
  • prefix-[up, down, left, right], to select by direction
  • prefix-q and enter the pane number, to go directly to the numbered pane

As for resizing the panes I went along with vim’s navigational keys to indicate directions to ‘push’ the panes.  Therefore, left (prefix-h), right (prefix-l), up (prefix-k), down (prefix-j).  To move 5 times the distance of the previous commands hold shift for each.

# Pane
# Make choosing the pane similar to vi navigation
set-option -g mouse-select-pane off
bind h resize-pane -L
bind l resize-pane -R
bind k resize-pane -U
bind j resize-pane -D

# Use the vi directions for resizing panes too
bind H resize-pane -L 5
bind L resize-pane -R 5
bind K resize-pane -U 5
bind J resize-pane -D 5

Copy and Paste

One of the things I found completely baffling in GNU Screen was how they decided to map the copy/paste functions.  tmux did a better job with open/close square brackets, but I decided to give up and use prefix-Ctrl-c and prefix-Ctrl-v.  Otherwise, I feel like copy/paste in tmux and screen are neglected because the defaults  don’t make much sense.  Also adding in a binding for xclip makes copy and pasting in tmux more practical.

# Copy mode
unbind [
bind C-c copy-mode

# Paste mode
unbind ]
bind C-v paste-buffer

# Move tmux copy buffer into x clipboard
bind-key C-y save-buffer /tmp/tmux-buffer \; run-shell "cat /tmp/tmux-buffer | xclip

As a vim user, I opted to have the mode keys follow the vi/vim conventions.  I suggest looking at the short table in the man page for tmux to see exactly what selecting vi or emacs for this option entails.  As for the mouse mode, tmux can acknowledge when the mouse buttons are depressed and allow for pane selection and resizing with the mouse.  I have this disabled though because I prefer keyboard navigation and it interferes with my selection/copy/paste operations too much.

# Use Vi mode
setw -g mode-keys vi
# Make mouse useful in copy mode
setw -g mode-mouse off

Environment

The following configurations determine what your tmux environment will look like, specifically conventions for text colors and window titles.

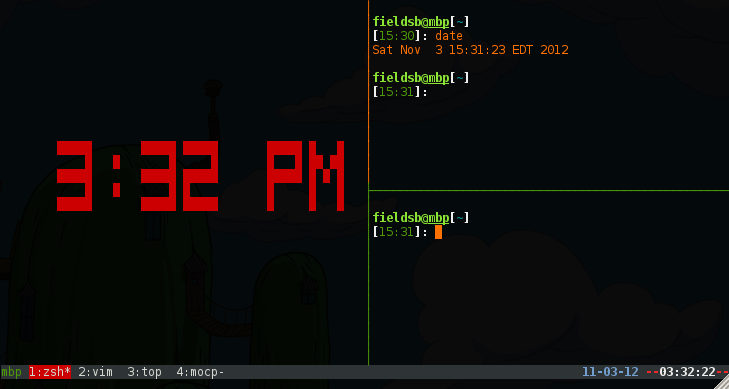
From my screenshot you can see the decisions I’ve made with regard to colors.  There are three panes open in the active window and there are four windows (each running a different application).  The active window is red and has an asterisk, the previous window’s title has a hyphen at the end.  tmux has the option to indicate activity on each of the windows from the toolbar, but I have this disabled because some applications constantly write to the shell.

# Status Bar
set -g status-bg black
set -g status-fg white
set -g status-interval 1
set -g status-left '#[fg=green]#H#[default]'
set -g status-right '#[fg=blue,bold]%m-%d-%y #[fg=red,bold]--#[fg=white,bold]%I:%M:%S#[fg=red,bold]--#[default]'

# Notifying if other windows has activities
setw -g monitor-activity off
set -g visual-activity off

# Highlighting the active window in status bar
setw -g window-status-current-bg red

Obviously, if you ever intend to use the clock in tmux you can set the color and mode.

# Clock
setw -g clock-mode-colour red
setw -g clock-mode-style 12

I always make sure my history has plenty of lines, since you can usually spare the memory and you can search through the history by entering copy mode and selecting ‘/’ (if mode-key is set to vi).

# History
set -g history-limit 100000

Lastly, remember to reload you .tmux.conf file after making changes.

# Reload the config file
bind r source-file ~/.tmux.conf

Conclusion

Every change I have made is a response to an itch I’ve experience when using a default tmux setting.   Being able to go into the config and get some relief is a beautiful thing.  Of course every change I outlined works great for me and not necessarily anyone else, so keep tweaking your conf until you find inner peace.

Once again, my .tmux.conf file can be view and downloaded here.