Problem:
Enable multiple selections in a GTK TreeView using the mouse (click and drag) to select the desired nodes/rows.
Solution:
For the most part this is a very simple and straightforward task; however, the first time I tried to do it I found the number of examples to be a bit sparse. First off I’ll be using the TreeView widget example from pygtk.org. If you are new to TreeViews you should read the official documentation first.
The following file can be downloaded from here.
[python]
#!/usr/bin/env python
# example basictreeview.py
import pygtk
pygtk.require(‘2.0’)
import gtk
class BasicTreeViewExample:
# close the window and quit
def delete_event(self, widget, event, data=None):
gtk.main_quit()
return False
def __init__(self):
# Create a new window
self.window = gtk.Window(gtk.WINDOW_TOPLEVEL)
self.window.set_title(“Basic TreeView Example”)
self.window.set_size_request(200, 200)
self.window.connect(“delete_event”, self.delete_event)
# create a TreeStore with one string column to use as the model
self.treestore = gtk.TreeStore(str)
# we’ll add some data now – 4 rows with 3 child rows each
for parent in range(4):
piter = self.treestore.append(None, [‘parent %i’ % parent])
for child in range(3):
self.treestore.append(piter, [‘child %i of parent %i’ %
(child, parent)])
# create the TreeView using treestore
self.treeview = gtk.TreeView(self.treestore)
# create the TreeViewColumn to display the data
self.tvcolumn = gtk.TreeViewColumn(‘Column 0’)
# add tvcolumn to treeview
self.treeview.append_column(self.tvcolumn)
# create a CellRendererText to render the data
self.cell = gtk.CellRendererText()
# add the cell to the tvcolumn and allow it to expand
self.tvcolumn.pack_start(self.cell, True)
# set the cell “text” attribute to column 0 – retrieve text
# from that column in treestore
self.tvcolumn.add_attribute(self.cell, ‘text’, 0)
# make it searchable
self.treeview.set_search_column(0)
# Allow sorting on the column
self.tvcolumn.set_sort_column_id(0)
# Allow drag and drop reordering of rows
self.treeview.set_reorderable(True)
self.window.add(self.treeview)
self.window.show_all()
def main():
gtk.main()
if __name__ == “__main__”:
tvexample = BasicTreeViewExample()
main()
[/python]
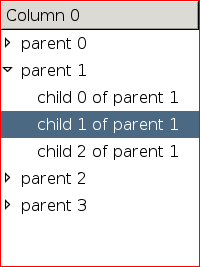
When run, the result will look like this:

At this point clicking and dragging you mouse will only move nodes around and will not allow multiple selection.
In order to do rubber band selection you must:
1) Set the “rubber_banding” attribute to be true for the TreeView.
2) Get the TreeView’s TreeSelection object, and set the mode to gtk.SELECTION_MULTIPLE.
self.treeview.set_rubber_banding(True)
self.treeview_selection = self.treeview.get_selection()
self.treeview_selection.set_mode(gtk.SELECTION_MULTIPLE)
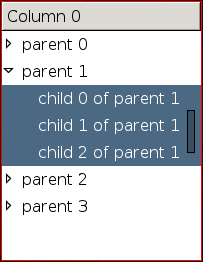
Adding the 3 lines above to the example code at line 39 will allow rubber band selection of a TreeStore:

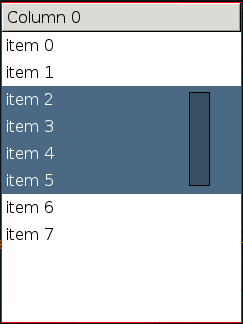
The selection works just as well if the TreeView’s model is a GTK ListStore instead of a TreeStore. The changes necessary to use a ListStore have been highlighted.
[python highlight=”27,30,33-35″]
#!/usr/bin/env python
# example basictreeview.py
import pygtk
pygtk.require(‘2.0’)
import gtk
class BasicTreeViewExample:
# close the window and quit
def delete_event(self, widget, event, data=None):
gtk.main_quit()
return False
def __init__(self):
# Create a new window
self.window = gtk.Window(gtk.WINDOW_TOPLEVEL)
self.window.set_title(“Basic TreeView Example”)
self.window.set_size_request(200, 200)
self.window.connect(“delete_event”, self.delete_event)
# create a TreeStore with one string column to use as the model
self.liststore = gtk.ListStore(str)
# create the TreeView using liststore
self.treeview = gtk.TreeView(self.liststore)
# add rows to the liststore
for i in range(8):
iter = self.liststore.append()
self.liststore.set (iter, 0, “item ” + str(i))
# add rubber-banding
self.treeview.set_rubber_banding(True)
self.treeview_selection = self.treeview.get_selection()
self.treeview_selection.set_mode(gtk.SELECTION_MULTIPLE)
# create the TreeViewColumn to display the data
self.tvcolumn = gtk.TreeViewColumn(‘Column 0’)
# add tvcolumn to treeview
self.treeview.append_column(self.tvcolumn)
# create a CellRendererText to render the data
self.cell = gtk.CellRendererText()
# add the cell to the tvcolumn and allow it to expand
self.tvcolumn.pack_start(self.cell, True)
# set the cell “text” attribute to column 0 – retrieve text
# from that column in treestore
self.tvcolumn.add_attribute(self.cell, ‘text’, 0)
# make it searchable
self.treeview.set_search_column(0)
# Allow sorting on the column
self.tvcolumn.set_sort_column_id(0)
# Allow drag and drop reordering of rows
self.treeview.set_reorderable(True)
self.window.add(self.treeview)
self.window.show_all()
def main():
gtk.main()
if __name__ == “__main__”:
tvexample = BasicTreeViewExample()
main()
[/python]

I hope this helps, enjoy your newfound functionality of drawing shaded rectangle over your TreeView!


